Database Connection using NODE JS example
Database Connection using NODE JS example
http://java.gunustories.com/2018/06/generate-node-js-web-application.html
var datafordb;
router.get('/adduser', function(req, res, next) {
datafordb = {
"userid": 'Demo User',
"email": 'demouser@xyz.com',
"password":'demo@123'
};
db.collection('login').save(datafordb);
res.send('Now yor data has been saved into database');
});
In my earlier article, you have learned how to create your
first node js application and how to create node js web application. If you
have not read it, I am suggesting you to read these two articles. Below are the
link of these articles.
http://java.gunustories.com/2018/06/generate-node-js-web-application.html
After creating a web application, you need to deal with
database. So before writing node js script, you need to download and install
MongoDB in your PC. To download MongoDB go to the https://www.mongodb.com/download-center?jmp=nav#community
link. Before start writing node js database connection, please insure that
MongoDB is running in your PC.
Now open app.js file
and write below configuration to connect with MongoDB.
const MongoClient = require('mongodb').MongoClient
var db
MongoClient.connect('mongodb://localhost:27017/', (err, database) => {
if(!err) {
console.log("We are connected");
db = database.db('training')
}
})
var db
MongoClient.connect('mongodb://localhost:27017/', (err, database) => {
if(!err) {
console.log("We are connected");
db = database.db('training')
}
})
router.get('/adduser', function(req, res, next) {
datafordb = {
"userid": 'Demo User',
"email": 'demouser@xyz.com',
"password":'demo@123'
};
db.collection('login').save(datafordb);
res.send('Now yor data has been saved into database');
});
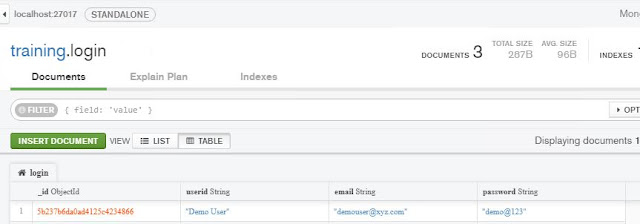
After successfully inserted data into MongoDB, you can check
it by using MongoDB Compass utility. Data will be showing in below format.

Comments
Post a Comment